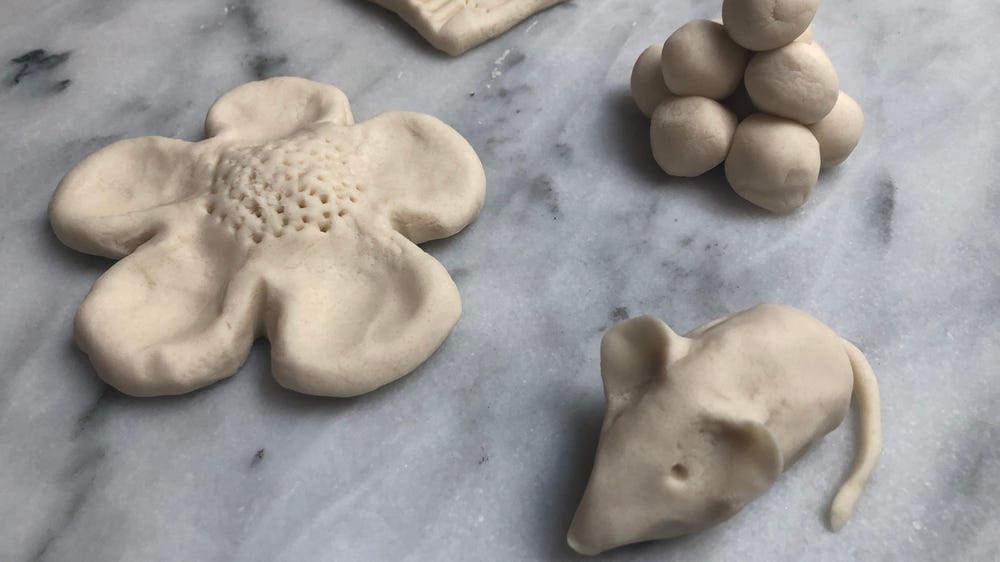
Inspired by Louise Nevelson’s Sky Cathedral’s Presence I (1959–1962) and Pablo Picasso’s The Orator (L’Orateur) (1933–1934), explore the sculptural properties of modeling dough, considering texture, pattern, and form. Use your hands and a selection of tools from home to create texture and pattern on the surface of the dough.
After making a tile of textures and patterns, your can create a sculptural form of your choice. The flexibility of this project allows for many possibilities.
Materials
- Modeling dough (recipes below)
- Selection of sculpting/texture tools, such as a popsicle stick, toothpick, fork, or corkscrew
- Washable placemat or chopping board
- Paper and pencil
- Camera (optional)
- Airtight container or resealable plastic bag
Modeling Dough Ingredients
- About 1 cup all-purpose flour
- 1 Tbsp. cream of tartar
- 1 grown-up to help!
- 3/4 Cup very hot water
- 1/2 cup salt
- 1 Tbsp. vegetable oil
Equipment
Measuring cups, measuring spoons, small bowl, wooden spoon, kettle or small saucepan for heating water, large mixing bowl
Directions
Measure 1 cup flour and the cream of tartar and mix in a small bowl with a wooden spoon. With a grown-up’s help, bring water to a boil, then let cool about 30 seconds. Carefully measure 3/4 cup very hot water, pour into large mixing bowl, and stir in salt. Add oil to hot salted water. Add flour mixture quickly and carefully stir to combine ingredients into a dough. Add a little extra flour if the dough feels too sticky, or a little extra water if there is still flour in the bowl. Once combined, stir vigorously. When the dough has cooled to a warm temperature, use your hands to knead it, working for three to five minutes. Store in an airtight container or resealable plastic bag to keep fresh until use.
Alternative Salt Dough
Ingredients
- 1/4 cup plus 2 Tbsp. water
- 1/2 cup salt
- 1 cup flour
- 1 grown-up to help!
Equipment
Measuring cups, measuring spoons, mixing bowl, wooden spoon, kettle or small saucepan for heating water, airtight container or resealable plastic bag
Directions
In a bowl, add water and salt and mix with a wooden spoon. Add flour. Stir to combine ingredients to a dough. Add a little extra flour if the dough feels too sticky or a little extra water if there is still flour in the bowl. Knead by hand for three to five minutes. Store in an airtight container or resealable plastic bag to keep fresh until use.
Questions to Consider
Look at Sky Cathedral’s Presence I. What shapes and lines do you notice? Can you spot the different textures and patterns in The Orator? What would it feel like if you could brush your hand over the surface?
While experimenting with the modeling dough, you can choose to journal on the paper, writing different words describing the textures of the dough. You can also write words describing how you can manipulate the dough. Would you prefer to sketch the patterns you make, or take photographs to document the different creations? You could also sketch or photograph your favorite tool.
Introduction
We are using dough to explore ways of making sculptures, which are three-dimensional (3D) artworks; they aren’t flat like drawings. With the modeling dough, we can create textures and patterns on what we sculpt. We can also write down and/or sketch our ideas on paper as we go. Later we will create a sculpture of our choice, using skills we learn as we go along.
Steps
1. Make the dough, (recipes above). Sit at a table with a washable placemat or cutting board, and paper and pencil nearby.
2. Pick up the dough and explore the material. Discuss how it feels in your hands (soft, squishy, smooth, or some other adjective?). Split the dough in half, setting one half aside for later.
3. Roll one dough half between your hands to make a ball. What can you do with it? Compile a list of action verbs (roll, press, poke, pinch, or some other verb) and allow time to experiment with the dough. Sketch or take a photo of what you create to share. Ball up the dough again to make something new.
4. Roll the same ball of dough between your hands or on the work surface to make a long sausage shape. Create a pattern along the top of the shape using just your hands. For instance, starting at one end, pinch the dough, move across and poke it with your knuckle, then repeat. Experiment to see how else you can use your hands to create a pattern. Sketch or take a photo of what you create to share. Scrunch up the dough and roll another sausage shape, to make a different pattern using one of the tools you have gathered. Use the tool in different ways to make different marks. For instance, use a fork to make small holes, then use the fork handle to press into the dough. Allow time to come up with several patterns to make, then share what you discover. Ball up your dough to make something new.
5. Working with the same half of dough, press it between your hands or against the work surface to make a round patty. Keep it about the same thickness as your hand. Use a popsicle stick or something similar to cut the edges of the dough into a square tile, or simply keep the round patty shape if you prefer. If you cut it into a square, don’t cut off too much; keep the square as big as you can! Use a tool to gently press into the surface to create texture. Consider using the same tool in a different way to create a different texture. Then explore using another tool to create other textures and patterns. What texture did you make and what tool did you use? Sketch or take a photo of what you create to share. Put your tile to one side; you can allow it to dry out to keep if you like.
6. Use the other half of the dough to create any form you like, using your hands, the tools, or both. Consider making smaller shapes that can be used together to make a sculpture. Form a sculpture from the whole lump of modeling dough, this time squeezing and pulling. The sculpture can be realistic or abstract. You can make one large sculpture or several smaller ones. Sketch or take a photo of what you create to share.
Reflection
What surprises did you discover when you experimented with the dough? What was your favorite tool and why? What was your favorite part of the project and why? How might you use these ideas when you’re making other art projects?
Share
We would love to see what you create! Email pictures of your artwork to families@famsf.org or tag us on any social platform with #deyoungsters.
