de Youngsters Studio: Studying the Surface Printed Book
By Jennie Smith, senior teaching artist
February 25, 2022
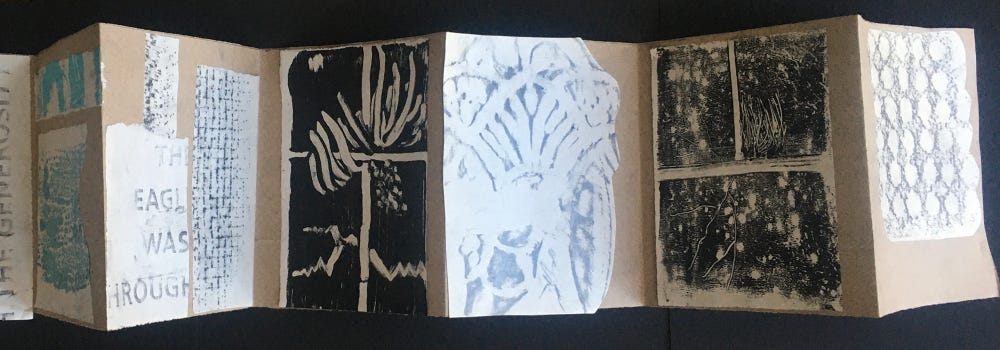
Inspired by Wayne Higby’s Rapids Canyon (1984–1985), create a book of printed and collaged textures observed in your neighborhood, using monoprinting and rubbing techniques.
Materials
- 4 x 6 in. or smaller pieces of newsprint paper
- Graphite stick or crayon (without paper) or drawing pencil
- Cell phone camera
- Newspaper
- Various tools for printing (your choice): cotton swabs, toothpicks, wire/regular sponge, etc.
- Glass baking dish (or other glass or hard plastic surface)
- Printing ink and brayer or acrylic paint and large brush
- Additional 4 x 6 in. piece of newsprint or other printing paper
- 6 x 30 in. piece of paper for book (e.g., a paper grocery bag)
Questions to Consider
- As you take your walk, carefully notice the various textures and patterns in both the natural and constructed areas of your neighborhood.
- When printing, have fun experimenting with the tools. Ask yourself questions along the way, such as, “There was this really interesting crack in the sidewalk I noticed—what tool should I use to recreate it?”
- When adding prints and rubbings to your book, spend some time trying out different placement decisions before gluing them onto the pages.
Steps
1. Gather materials needed for a walk around your neighborhood. While on your stroll, notice the textures and patterns of the different surfaces around you. Take photos and make rubbings.
2. Create a rubbing by placing newsprint on the surface (e.g., sidewalk, tree) and gently but firmly swipe across the paper using the side of your crayon or pencil.
3. Once back home, set aside the rubbings. Make sure you have access to your camera in case you’d like to look at the photos for inspiration.
4. Set up your printing station. Protect your work surface with newspaper. Gather your chosen printmaking tools.
5. Roll out printing ink or use a large brush and a thin layer of acrylic paint on the bottom of a glass baking dish (flip dish first). Using your chosen tools, create marks that remind you of the textures and patterns from your walk. Refer to your photos or memory.
6. Once you are ready to print, place paper on the surface. Hold the paper in place with one hand and press and rub across the paper with the side or palm of your other hand. Once you’ve rubbed all areas, pull off your paper to see your print before it dries too much.
7. Make a simple accordion book by folding your book paper in half lengthwise. Continue to fold flaps. Glue your rubbings and monoprints into your accordion book. If you’d like, cut and collage pieces of your prints to create different designs. Now you have your “Surfaces in my neighborhood book,” which can be viewed both vertically and horizontally.
Reflect
- What did you notice on your neighborhood walk? Did you make any new observations about where you live?
- What did you learn about monoprinting? What printing tool did you enjoy using the most and why?
- If you could do this project over again, what would you do differently and the same? Why?
Share
We would love to see what you create! Email pictures of your artwork to families@famsf.org or tag us on any social platform with #deyoungsters.
