de Youngsters Studio: Horizon Line Collage Inspired by Ed Ruscha
By Hannah Freeman, Senior Teaching Artist
August 28, 2020
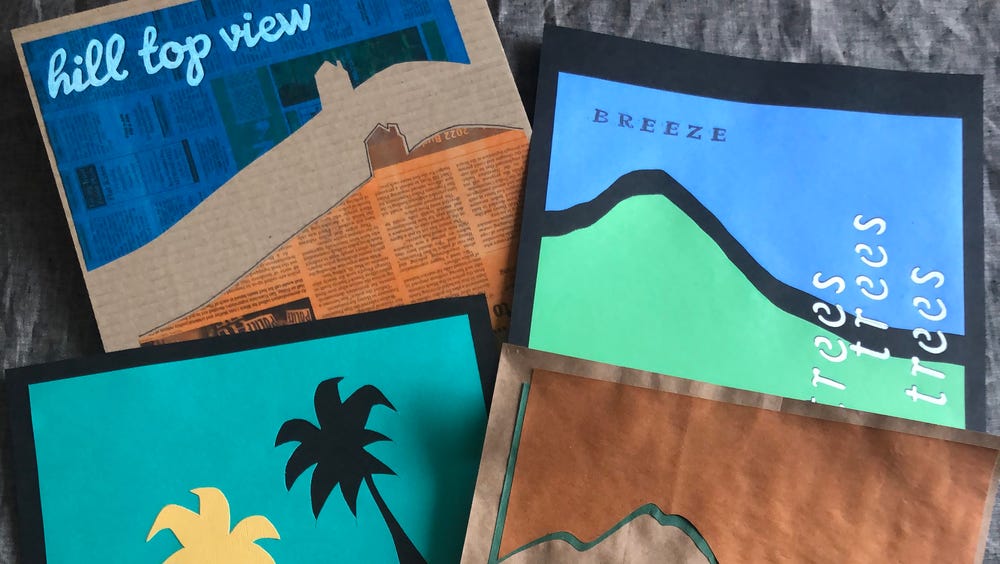
Inspired by the painting A Particular Kind of Heaven (1983) by Ed Ruscha, this activity invites you to create a simple collage landscape representing an ideal place, focusing on the horizon line. While exploring the landscape’s color and composition, consider including a word or message. This is a common practice of Ruscha, who sometimes refers to the text in his artworks as “accidental poetry.”
Materials
- Spare paper
- Pencil
- Eraser (optional)
- 2 different color sheets of paper, each sheet 8 x 10 in. (or painted newspaper cut to size)
- Small binder clips (optional)
- Scissors
- Black paper or cardstock, 11 in. square (or cardboard/brown grocery bag cut to size)
- Glue stick (or any type of glue)
- Black and white pencils and/or pens for lettering
- Alphabet stencil (optional)
- Alphabet stamp set and ink pad (optional)
Questions to Consider
- What do you notice about the horizon line in Ruscha’s painting A Particular Kind of Heaven?
- Thinking of your ideal place, how does the horizon line look? Is there a hill or valley, a small house or a large tree? Is the horizon line low, showing lots of sky, or is it high, showing lots of land or sea?
- Consider what words or message you want to use as you’re making the collage.
Steps
- Using some spare paper and a pencil, experiment drawing simple horizon lines. Keep in mind this line will ultimately be cut with scissors, so it needs to be simple.
- Choose two color rectangles, each of them 8 x 10 in. Think about how different colors make you feel and what fits best for your ideal place. The color choice can be realistic, abstract, or symbolic.
- Stack the two color rectangles together. Lightly draw the horizon line on the top sheet only. Cut the horizon line through both sheets of paper at the same time; hold the sheets firmly by hand or use binder clips so they don’t shift. (Tip: move the paper, not the scissors, to follow any bumps and dips in the line.)
- Experiment placing the two different color pieces on the background 11 in. square paper, to see which color you want at the top and the bottom. Vary the placement options, close together or far apart, straight or at an angle. Try matching the cut horizon line like two pieces of a puzzle, or flip one of the pieces over. Stick the two pieces onto your background square using a glue stick (or any available glue) or experiment and stick all four cut color pieces.
- Consider what word or message to add to your collage, the words could be about the place, or what you feel when you’re in or thinking about that place. Practice writing out the words on some spare paper first and envision their placement and size on the composition. You can use an alphabet stencil, alphabet stamps and ink pad, or write the words by hand.
- You can add some simple drawn details such as a building or tree on the horizon line, or you could accentuate your written message by outlining the letters or adding some drop shadows.
Reflect
Imagine you are in your ideal landscape. What feelings does it give you?
What about this place makes it a “particular kind of heaven” to you?
How might you expand on the word or message in your collage to make a longer “accidental poem”?
Share
Perhaps after making the project and showing your family and friends, you could invite them to contribute their word or message, which you could compile into a community “accidental poem.” We would love to see what you make too. Email pictures of your artwork to families@famsf.org or tag us on any social platform with #deyoungsters.
